Construction of a 13th Century Armoured Surcoat
By: Ernst der Dunkenwolf
|
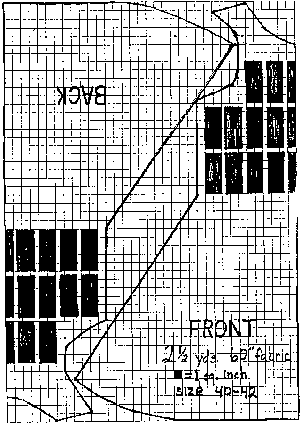
The second half of the thirteenth century saw the introduction of plate reinforcement over mail in European armies. One such development was the armored surcoat. Eventually, the reinforced surcoat would evolve into the coat of plates, such as those excavated at Wisby. The reinforced surcoat of circa 1260 was a much simpler affair, however. An excellent depiction of such an armor may be seen in Claude Blair's European Arms and Armor, p. 49, fig. 18. A reconstruction of such simple body armor is easy to make. First, select a strong fabric such as canvas, denim, or trigger in the primary color of your arms. Next, cut out the surcoat pattern. Two and one-half yards of 60" fabric should be enough. Next, obtain a number of nail plates from your local lumber yard or hardware store. Nail plates are used to strengthen joints in wood frame constructions and are available in a number of sizes. I suggest using those measuring about 2" x 5". These approximately 18 guage plates cost from $.20 to $.25 each, are pre-punched with a number of holes, and are galvanized to retard rust. If you prefer, you may cut and punch these plates yourself. Cut the corners on the plates with a pair of tin snips or grind them round. Now, lay out the plates on the surcoat in a manner similar to that shown on the pattern and mark the four corner holes of each plate onto the fabric. Using an ice pick or awl, spread holes in the fabric where you marked the holes for the center plates. Do not make holes in the fabric with a punch: this cuts the thread and causes the fabric to unravel. Tandy quick-set rivets have sharp edges on the caps which can also cut the fabric and cause armor failures. Instead, rivet the plates into the surcoat with 2 lb. tinner's rivets. Peen the rivets on the plate side. If you think the rivet head will pull through the cloth, look at the size of the rivet used to reinforce the seams on your Levis. You can always put a washer behind the rivet if you feel it's absolutely necessary. Add more plates working from the center to the edge. Leave about a 1/4" gap between plates. Feel free to trim the plates down with your tin snips to make a better fit. Finally, sew the surcoat up the sides. Split the front and back, and then hem the bottom, split, arm holes, and neck line. It is not clear from the original carving whether the plates extend around the back of the gown. I suggest lining the back with plates for kidney protection. If you find the garment too difficult to don or remove, you may leave the side open down to the waist and lace the side shut. I strongly suggest wearing this surcoat over some type of padding.
|