A brief discussion on sheetmetal cutting tools, methods and practices
or
How to go mad and bleed lots on the way to producing a little bit of armour
by Sasha


A theme that repeats with great frequency on the ArmourArchive is "how do I cut metal?" And it is true that there is a staggering number of tools around that allow you to cut sheet-steel into the pieces that you will shape into recognisable and usable armour.

Here is a quick and dirty look at a few of the major tools and techniques out there. I will mostly be looking at the following criteria:

  • Flexibility of cuts. Let’s face it, it is all about how tight a corner you can turn. I will also try and look at whether the tool allows cutting of only flat sheet or if it will cope with material that has been dished and needs to be trimmed.
  • Noise levels and power needs. Is it a three-phase power-sucking monster? Is it cheap because you also need to own a $5000 air compressor? Will the noise crack concrete foundations and compete with nearby airports? Is it hand operated and stealthy ... but only if you are a gorilla?
  • Consumables. What does it eat? Do you need to replace blades often? Or does it eat tungsten spark-tips? This section deals with the general considerations and costs of running the tool.
  • Durability. How long will it last under normal operating conditions in an armouring workshop? Does it cost a fortune to repair and service?
  • Capacity and limitations. What will it cut, what will it absolutely not cut?
  • Finish. What sort of edge it leaves on both the armour and the remaining sheet-steel?
  • Cost. A ball-park guestimate of the actual unit cost, as well as any peripherals that the unit simply must have in order to run.

In all instances I am assuming that you have taken the time to read the material that came with the tool, have familiarised yourself with it a little and have procured and are using all of the relevant safety gear. Do we understand each other?


The tools that we will be looking at are as follows.

What have I let myself in for?


TEETH.

Well, they kind of work for leather, and I think I know someone that could probably manage aluminium…But the edges need a lot of finishing and filing.

Considering that one of the main "peripheral costs" of this method is some very expensive visits to the dentist and the major "consumable" is you, I would avoid this method of cutting sheet-steel.


Cold chisel and hammer.

Try it just once. That way for the rest of your life you will be able to say you have.

You can get amazing curves and angles to your cuts, but it is incredibly labour consuming and very loud to boot. On the bright side you do not need to "plug in" to anything at all, and if you need to whip up something armourish at a camping event, these tools are your friends; of course, no one that is camping within earshot of you will be.

Even after you have gotten neat and efficient, there is still a lot of cleanup and filing to be done in order to get less then saw-toothed edges.

Consumables are sweat and patience. You will also need to sharpen the chisel from time to time.

Capacity. This method cuts stainless and mild steel with almost equal success. Will happily do up to 2.5mm material but tends to warp and mangle the 18ga and thinner stuff unless you work onto a wooden block (which eats a lot of the efficiency)

Cost. You can’t do much better without resorting to teeth. A GOOD chisel (one that will not over-harden and shatter or is too soft and blunt) will cost about $6-10US and a good ballpeen hammer from about the same upwards. You can use the hammer for other exciting things as well, though.


Aviation snips / Tin snips.

The olde fashioned way

Giant tin snips with one "arm" buried in a wooden tree stump are the truly traditional tool for cutting sheet metal in period. It even works if you care to modify a really good and large pair of these shears into such a tool. At anything less then this, these tools are primarily useful for very thin gauge materials in steel or brass decoration. Also useful for aluminium….if you like that kind of stuff.

The major variable characteristic of these tools is the amount of money you are willing to spend on them. The bottom end of the market is made up of soft-as-butter Taiwanese-made snips that you see blister-packed in auto shops and supermarkets. These are as a rule completely useless and should be avoided. At the other end of the spectrum are aviation snips made by companies like Wiss and Prosnip.

Aviation snips are made in specialist varieties to suit the cut being made. One pair is designed for straight lines and very tight right hand curves, while another pair is designed for tight left hand curves, yet a third is a versatile straight and both-ways shallow curves unit. You will probably want to own two or three of these overall.

The advantage of av-snips over standard tin snips is the compound action of the handle, which allows double the cutting power to reach the jaws. It can still be pretty tough going using these though.

I would not use av-snips on steel thicker then 18ga mild….and probably not for too long if I valued my hands.

The edges are usually left pretty clean but can sometimes have little notches if you have been turning tight corners. Some cleanup with a file or abrasive paper is recommended.

How long these tools will last depends on how much you spent in the first place and what you put through them. Even at 18a you are running the tool so close to its capacity that it does not take much to break it

These are ideal for brass trim to decorate armour, though.

Note about traditional tin snips. The turning circle is usually much less tight, the capacity of material is a bit better then av-shears if you spent real money on good tin snips. Record produce an excellent offset-blade model of tin snip.

Cost: Av-snips start at about $15US for a general purpose pair and go to around $25-30 for one of the specialist cutting units. Do not bother buying the cheap and nameless ones. Decent traditional tin snips go for about $30 and up.


Hacksaw and jeweller’s saw (AKA piercing saw)

Both of these tools are limited by the depth of the throat between the blade and the spine of the saw. Both tools are useful for details and specialty applications (A hacksaw is the ideal tool for turning rivets into parts for visor locking mechanisms and such) and the jewellers saw will give breath holes and brass decoration an incredible level of detail (depending on your sanity and spare time)…but it is unlikely that you will be able to efficiently cut out a full sized piece of armour with either of these tools.

Jeweller’s saws eat blades like nobody’s business (especially when working steel and even more when working stainless). If you start using them in armouring, buy them by the gross instead of the dozen.

Always wax your blades. If you are following intricate cutting lines, try rubbing the wax on the BACK of the metal you are cutting, this will keep the wax shavings from obscuring where you are going and making the kerf sticky.

For hacksawing heavy barstock and such, use Trefelex or a similar cutting compound; it makes the job easier and preserves the blade life.

Cost. Hacksaws are cheap, Maybe $10 for the frame and $1-2 per blade. Piercing saws are better if you buy quality German made frames rather then cheap Chinese ones that will snap. Maybe $20. Blades are variable depending on how many you want and where you source them. About $2.50 per dozen.


Record brand hand-operated disk-blade throatless shear

This tool is a bit of a rarity nowadays but is worth grabbing if you happen to come across one.

Looking a little like a deranged pair of bolt cutters with disks where the blades should be, this is an English made tool that allows you to work the shears around the steel rather than feed the steel to the bench mounted shear (as is the case with most throatless shears). This thing cuts very nice tight circles but leaves a grooved edge behind on the piece of metal that isn’t facing inwards (likely the armour you want to cut out). The blades need to be sharpened and replaced from time to time and they are now very hard to find as the tool is more or less mythical in this day and age.

Max capacity is 16ga mild. It is hand operated and silent, very portable and you do not need to use too much strength to make it work. Being built by Record before they started getting all their stuff cast in China, the body of the tool will outlast dozens of blade replacements.

Cost. You may find one second hand for about $50 to $100 US. It is a nice addition to a workshop, but I would not like to rely on it as my sole method of cutting out armour.


Straight bench shears

SCA group armouring just like the olden days.

I have a special place in my heart for this kind of shear because it is what my Barony owns two of and what we all learnt how to armour with. The place in my heart is one of abject horror at the idea of going back to having to use this tool!

Straight bench shears (as opposed to gay ones, I guess) are a somewhat limited application tool. They will cut endless straight lines and will do outside curves if you put in a bit of extra sweat... but they will not do inside curves of any kind. Ever.

This does amazing things to how you design armour patterns as you desperately try to get around this limitation. You CAN get by with this as your only means of cutting steel... but why not just stick white hot needles under your eyelids for a cheaper way to experience the same amount of joy?

This tool is pretty wasteful of steel but otherwise has no costly habits. Blades should last for nearly all eternity, the thing doesn’t want power, the odd bit of grease in the mechanism will see the shears last and last.

A little more seriously, in combination with a secondary cutting tool like a jigsaw, this is a decent sort of tool. Many brands feature secondary functions like guillotines for barstock or angle iron and even folders and benders for flat stock.

NOTE: The ROPER WHITNEY THROATLESS SHEAR is actually just a straight bench shear. I have no idea why they advertise it the way they do, but really, it is one of these things.

Cost. Depends on what capacity you want. The full range is available. A unit that will cut 2mm mild will cost around $75US new…this can quickly increase to several hundred dollars depending on the model, brand and capacity.

Finish. If the blades are properly aligned (a bit of an art in its own right), the edges should be crisp and clean…this means a bit of a sand down with abrasive paper to round them off is a good idea.


Angle grinders

It is indeed true that you can do nearly everything in the craft of armouring with an angle grinder... if your will to live and retain all your limbs and faculties is small enough.

Using a cutting blade on an angle grinder and using the machine at some disturbing angles will actually allow you to sort of annoy metal to give up around fairly tight curves. You will then get to do lots and lots of cleanup and finishing on the edges. But that shouldn’t worry you, you can use an angle grinder running abrasive disks to do that!

If you use a 4inch grinder with a half used disk and lay it over at an angle (you will get to know the angles once a few disks have exploded against your chest) then you can manage to do about 2-2 ½ inch curves. You will then be able to shape them to whatever you want as you grind away on the piece to neaten it up.

Really, this is a sort of desperation measure armouring tool for cutting out patterns. For many other applications, though, the angle grinder (or better yet 5 angle grinders) is your very best friend in the workshop.

Noise and power. Lots of both! Cordless angle grinders are not even worth it as novelty paperweights. You are going to be working from nearby a powerpoint. They come in whatever voltage setup you require where you are. Noise is a big issue. The screaming of angered banshees having a reunion on a tin roof just about comes close to how much noise you are going to generate. DO WEAR THE EAR PROTECTION. REALLY. (also the eyes and gloves and ...)

Capacity. You can cut nearly anything with an angle grinder. From little tiny 1inch burr grinders to 12inch rip-your-leg-off grinders you will find a size to suit your needs. 4inch and 4 ½ inch models are the most general purpose useful standard.

Consumables. Cutting disks are available in both mild and stainless steel (as well as stone cutting, if that is your thing). Cutting and grinding disks are the general division. Do NOT use one to do the job of the other. Flap disks and rubber backed abrasive disks are also a standard good-thing to have in the workshop for your angle-grinder. Most of these disks are cheap... but the cost does add up.

Cost. Angle grinders range in price from $20 for the pretty bad ones to about $40 for the generally reasonable. Metabo, Bosch and other top of the range grinders will happily go over $100US for a 4inch model. Check the warranty that works for you. Grinders die pretty fast in armouring workshop applications.


Beverly throatless shears

Sweet metal cutting paradise, thy name be Beverly

Okay, so that may be overstating it, but if you asked ten armourers on the Archive what they choose to use to cut sheet-metal, nine would say a Beverly shear and the tenth would probably ask you to repeat the question because they had gone deaf from using powershears.

If you can get hold of a Beverly shear then do so. It is as simple as that. It may not do absolutely all of the cutting you will need, but it will come closer then just about anything else.

Beverly shears are a hand operated throatless shear that has long blades instead of the disks that were mentioned for the Record shear. Because of this the blades do not introduce groove marks or other distortions to the edges. Cleanup is either minimal or non existent (depending on fine tuning the blade adjustment, it can actually gently round edges as it cuts).

The amount of power needed to work one of these is pretty reasonable, they will cut just about any sheet material including plastic and other illicit substances of armouring.

Beverly shears come in three sizes, conveniently these are called the B1, B2 and B3.

If you buy the set you can perform the nursery tale of Goldy Armourer and the three Beverlys.

Of the three sizes, the most generally useful for an armouring workshop that works with helm-thickness material and stainless steel as well as mild is the B2. This is heavier duty then the B1 but has a tighter turning circle then the monstrous B3.

Details and graphs of what these machines can do is readily available on the net (www.beverly.com). Second hand machines can be purchased in the reasonable belief that they will be fine and working for several decades to come. This is a very tough and long lived tool. The saving on the second hand tool may seem smaller than expected…this reflects the fact that the tools don’t "wear out" much.

The Beverly site is the best place to find recommendations for cutting capacity of each model. I have used a B1 to cut 2.2mm stainless into fairly intricate curves…but am much happier with doing it on a B2.

Cost. Around the $400US for a second hand model B2, around $550 for new.


Non-Beverly throatless shears (brief overview of a few brands)

Although Beverly shears are very much the "standard" in bench mounted throatless shears, there are other brands that are available. Most known of these is the Harbour Freight imitation of the B1. As with many Chinese-made tools, the blades are glass hard and often brittle, quality control is somewhat haphazard and the only thing that this shear truly offers is its very low price (around $100US). Essays are available on the Archive of how to make your shear work (or at least stand the best chance of working that it can). When all is said and done, the HF shear still has slightly less capacity and a good deal less reliability then the B1 original. I personally would not have it in my workshop; many other armourers do.

Metropolitan Machinery (also trading as The Sunroof Company) produce their No.38 throatless shear. This a somewhat squat looking version of the Beverly but has cutting capacity of up to 14ga Stainless with a 4inch turning circle. The lever looks longer then the B2’s, which means a bit of extra work. The cost is around $520US…Which makes it as expensive as the Beverly. I have never actually used this shear, just found it when I was researching this essay. It may be wonderful.

Edwards throatless manual shear. This strange machine is the hand-cranked version of their heavy powered shear that I will discuss later. It is operated by turning a coffee-grinder-like crank set at an angle from the top of the machine to rotate a drive wheel and push the metal between two cutting disks. It takes me both hands and a short prayer to whichever deity is watching the workshop that day to properly control the metal being cut by my Edwards powered shear…I would hate to think what it would be like one handed while I turned the crank to make it go. Capacity is around the 14ga stainless. Cost is around $200-250US (second hand).

Spare parts are almost non-existent, but the blades are very good and can be resharpened about 50 times.

Roper Whitney throatless shear. As mentioned earlier, while this company makes superb metal punching tools, they seem to lack any kind of clue as to how to identify the two shears that they sell. Neither of them is a throatless shear, disregard their advertising on these.

It’s nameless, but it’s blue. This tool is a disk bladed throatless shear that is operated with a lever handle instead of the Edwards’ crank. The brand of this machine escapes me, but the specs are known to me. It is a strictly light duty tool and stresses out at 16ga mild steel. It is reported to leave quiet noticeable teeth marks from the drive wheel on the plates it is cutting. Best described as a can opener with delusions of grandeur. Cost is around $25 higher then the HF shear.


Electric power shears

A pretty wonderful tool, all things considered.

I like power shears. They are portable, they let you travel around a large piece of steel instead of having the bother of trying to feed it through a bench mounted unit. They are an excellent companion tool to the Beverly or similar shear. Capacities and quality of brand determine cutting capacity and longevity to such a great degree that this entire essay could be exclusively on the brands and models of powershears I actually know exist (as opposed to the dozens of strange brands I have never met... yet).

The basic story across the board is that powershears use the same general throatless design shape as the bench mounted throatless shears, they turn it upside down and have one rapidly reciprocating top blade (same principal as a jigsaw) and a fixed blade in the bottom anvil-plate. Once they have been set correctly to the thickness of material you are cutting, they go like the wind! Sometimes more like a wild horse, actually. It may take a bit of practice to actually cut OUT the armour pattern and not just cut through them. They tend to be loud (the worse the blade adjustment is, the louder the tool, and that doesn’t include the noise of operator swearing), they also require that the metal sheet be clamped in such a way as to allow lots of support and vibration absorption (these things can set up a LOT of vibration and be a literal pain to use) while leaving a space beneath where the tool is actually working. This actually makes for a fair bit of wasted space and annoyance in the workshop. You either need a dedicated cutting bench that is kept clear of stuff most of the time or you need to clear you workbenches every time you want to cut form a largish sheet. I know how much I enjoy that!

For my own workshop I finally came up with a pair of tall wooden saw horses with closed-cell foam lining the tops and some sliding clamps. This solved most of the problems.

Things to note about powershears are that they are fairly fragile and easy to damage through poor practices or "bogging down" (where the shear gets stuck in the sheetmetal and you need to remove it somehow). Anvil plates for these things are stupidly expensive, often costing more then the original tool. Blades wear out noticeably and will need to be replaced every one to two years. Blades are too small to really sharpen. Some machines like the Bosch have four sided blades which allow you to rotate the cutting faces to get the most life out of them.

Note: Because of the reliability issue of getting replacement blades over the years, make sure that the cheap pair of Russian-built or other "unknown" powershears actually has some service and parts backup that you can get to. Having to get new parts machined up from scratch will quickly negate the "bargain" you got on the tool.

As mentioned earlier in regards to vibration issues, if you have arthritis in your hands or wrists, this is not the tool for you.

Consumables (besides the blade and electric power) consist of a good cutting compound or machine oil. Because of the fast action of these tools, heat gets built up and the blade can "bind" on the way back up from making a cut. This is what triggers vibration attacks, it can also chip the blades. I tend to apply cutting compound (I like Trefelex, it smells good when it heats up) to the underside of the sheet, loosely following the lines. This way the lines are not obscured and I can see where I am going, but the cut is still lubricated.

The brands I have owned and recommend are Metabo, Bosch, Atlas Copco (being badged as something else when I bought mine) and Makita.

The size of the tool will determine the minimum circle it will cut…but even the large shears with a 2.2mm Stainless capacity will cut a 3inch circle…which is better then the Beverly B1.

Costs vary widely depending on whether you are buying new or second hand and which brand and capacity you opt for. Let’s say that you can get as low as $75US and happily go over $1000US for a brand new top of the line Metabo. Happy hunting!


Electric jigsaw

Every workshop should have one. Really!

There are good jigsaws and bad ones. There are good blades and bad. Finding the best working combination of both will give you an excellent workshop tool. Getting it wrong will give you something to swear at for a long time.

Firstly, with jigsaws used in metal cutting, almost more then any other tool in the workshop, QUALITY DOES MATTER. A $20 HF jigsaw will not last the distance or give the performance. I use a Metabo industrial model, oscillating jigsaw. It has lasted me as my primary metal cutting tool for a little over 7 years now. It is still a pleasure to use and has an electronic clutch-like sensor that prevents grabbing and binding and means a very low-vibration cut. I personally use bi-metal blades and get very good, long lasting performance from them. For stainless I use a specialty blade that is called "Cobalt" (no idea if it actually has cobalt in it or not). The underside of the cut is ALWAYS smeared with a bit of Trefelex or other cutting compound and the jigsaw is usually set to the first notch of oscillation and run at full speed (this is not what the instruction book tells you to do, but it really works better). Always wear safety glasses, kerf gets thrown everywhere, and nearly always where your eye needs to be.

Always work in a well lit area. Being able to see where you are cutting will make everything work better.

The cuts you can get form a jigsaw are very tight and you can do enclosed cuts (eyeslots and stuff) by drilling a hole and then putting the jigsaw blade through it to commence the cut. The only real restriction on safely using a jigsaw is that you need to have enough steel to rest most of the jigsaw’s undercarriage on for support…or it will jig all over the place and not saw a thing.

The noise levels are pretty good, but not as quite as a good set of powershears. The power requirements are pretty minimal (less then an angle grinder). You will go though a few blades (more, before you learn how to use them efficiently and not put side stress on them). Cheap jigsaws will not last a week of solid metal cutting. The lack of oscillation will also clog and overheat the blades leading to faster deterioration (did I mention that buying cheap was not a good way to save money with this tool?). A decent jigsaw like a Metabo, Bosch (the same old names keep coming up, don’t they?), Makita and Atlas Copco (who also sell as Milwaukee) are all good brands to go with. I personally would not buy Black and Decker or De Walt jigsaws for cutting steel. They are more expensive then the $20machines but seem to die just as readily (that could just be my experience).

Jigsaws are also useful for cutting plastic, leather and aluminium as well as making your shields. Like I said, a "must have" tool in the armourer’s workshop.

With a bit of practice you can get a good finish, but a bit of a sand to round the edges is usually a good idea. There can be a bit of deformation if the pattern is unsupported or is right on the edge of a metal protrusion so that the blade grabs it and fights. Otherwise it should be great.

Mostly I went over to the Beverly because it was silent and I began to use my cutting out time as the quite activity to wind down at the end of the day. The jigsaw is good, but you cannot get too relaxed and complacent while using it.

Cost. Try spending at least $220US on a jigsaw and try to buy a new one with a decent warranty (as in do not try and pay too much, but price your models and then get the best bargain you can for that same model you have decided on).


Band saw

I spent a year in which most of my cutting out work was done with a band-saw and a jig saw for fine detail.

The most limiting factor of a bandsaw is the size of machine you can afford. The larger the frame and wheels, the more space you have to work in on the "table" of the machine. If you can get hold of a metal cutting bandsaw (the motor is not directly under the table and some have liquid cooling spigots and recovery systems) then you will have a very fine cutting tool for armouring. Unfortunately this makes them a bit pricey. The long blades allow the teeth to cool better then with a jigsaw (more time before a particular tooth is introduced to the metal cut again) and better still the blades can be sharpened a time or two.

Turning circles are not bad and you can "cut in" a lot to create even tighter curves. The major downside is that you need to start at an edge. You cannot cut the face-slot of a helm, for example.

A bandsaw with a liquid cooling system is not too loud, but does generate a fair bit of mess from all the fine kerf shavings hitting the ground. You also need to cut your large sheets of metal down to a manageable size before cutting out your patterns.

Mild and aluminium tend to cut far better then stainless (which can grab the blade and cause breakage)

I didn’t have room to move my bandsaw when I moved house about 7 years ago. I still miss it sometimes. It was a demon on cutting sole leather and other stuff too.

Consumables are the blue cutting liquid and the blades, which are about $30-60US for a blade each... but can be sharpened a few times and last a long time. The unfortunate bargain is that the more durable the blade you want the less manoeuvrable it is on curves, so you need to strike a balance.

A good bandsaw blade will leave a crisp 90° edge on your cuts…so you will want to round it a bit.

Cost. Could be anything at all. It could be offered to you for free and it could cost you $3000US brand new…this is one of those tools that just has to "happen" to you.


Stationary Jigsaw (reciprocating bench saw)

Combining the worst features of both the jigsaw and the band saw.

This is now a hard-to-find tool, but they still crop up in machinery sales from time to time. The machine works by having a jigsaw mechanism mounted beneath a cutting table. An extra long blade then comes up through the table and is further supported at the other end by either an arm made of spring-steel or an arm with a coil-spring between the blade clamp and the rigid arm. This provides good tension to the blade…in the days that jigsaw blades were pretty crappy. Nowadays, this machine is pretty useless, even for the home armoury.

As some of you can now guess, the blade is not as long as the bandsaw’s, thus cannot have the time to cool between contact with the metal being cut. The blade does not run in only one direction, meaning you still get vibration, noise and bouncing work. The saw blade needs to be supported at both ends, thus you are faced with a throat-depth problem similar to both the bandsaw and the hacksaw.

In short, don’t bother with this machine. It will not do you any favours. Some dinosaurs deserve to die out.


Nibbler

Not in my workshop!

What can you say about nibblers? They are the retarded, moron, inbred cousin of the powershear? Okay, that may be too harsh. If you are cutting corrugated iron roofing, a nibbler is your friend. For cutting out armour? Forget it!

A nibbler works by punching holes in exactly the same way as a Roper-Whitney punch does. You have a reciprocating punch and a set anvil with a hole in it that the punch is keyed to. The punch goes up and down rapidly and you get to move the tool along on the steel. The holes link up to form a slot which can be used to cut out shapes. Great.

The problems with this tool (other then the being loud and vibrating and stuff) is that the kerf (the bit cut away) is very wide. You cannot butt up two pattern pieces and cut them out. You lose a lot of metal. Where does that metal go? Well, it turns into little tiny crescent shaped caltrops that get into the soles of your boots. And when you walk into the house they will scratch your floorboords and kill your carpets in next to no time. They will do this while also eating your shoes. I have killed a brand new pair of work-boots in under 6 weeks when I was using a nibbler on a regular basis. You NEED to clean up the workshop every ten minutes of using a nibbler. Any of the crescents that get wedged into wooden workbenches will be waiting there to scratch any work you put there or tear open a hand as it sweeps by.

The bright side is that these things can turn any angle you like. The machine can pretty much cut a line in, turn and follow the same line out, as long as you do not mind a 5mm wide cut. They will also work on already dished and shaped pieces very well (thus why they are used so much for corrugated roofing). I refuse to have one in my workshop because of the contamination of everything with the sharp crescents of doom. As with the powershears, the model and make of the machine you select will determine capacity and price. Most of the dedicated units will cope with 14ga mild with no trouble. Extended use on stainless will start to kill the punch mechanism as stainless goes taffy (sticky) as it heats (friction) and then work hardens from the multiple impacts, making it harder for the tool to do its job. They tend to be a little cheaper than their equivalent in powershears. Do not bother with the nibbler attachment for powerdrills. It cannot cope with mild steel above 18ga at the best of times and will kill your drill with force feedback impacts.

Nibblers also work better with cutting compound or oil used in the same manner as with powershears and also occasionally need the punch and anvil replaced.

These tools are available in both electric and pneumatic forms. The problem is unfortunately not the power source but the tool itself.


Stationary nibbler

'Copicut' Throatless Sheet Metal Profiler. This thing looks like it might just work!

The Rodwell Engineering Group has just released this toy. It is a nibbler mechanism mounted from a cutting table (upside down from the hand-held nibbler arrangement). The advantage of this over the normal nibbler is that the unit actually sucks up its own mess, meaning that you do not get little sharp crescents all over the workshop. Instead you get to open a drawer in the side of the machine from time to time and empty out the millions of little sharp nasties. Then you can load handfuls into balloons or something and fire them out of your trebuchet in the direction of your annoying neighbour’s fascination with boy bands cranked out at full volume...

Errr…did I just suggest that? No. Don’t do that. It would be wrong!

The specs on this machine claim that it will easily cope with 10ga steel.

You can find out as much as I know about this tool by going to http://www.rodwell-engineering.com/newsdetail.asp?artid=36

I have no idea of the price.


Powered disk-blade throatless shears

A few years ago I purchased a throatless shear over the internet. I thought I was buying the manual Edwards throatless shear mentioned earlier. What arrived had a huge three-phase motor on the top, and so began an adventure of trying to keep all my fingers attached to my hands.

These huge throatless shear monsters are made by a number of companies. My model is by Edwards (English). Ennox, Marshaltown and Pexto also produce similar machines. Cutting capacity is around 2.2mm stainless. Mine will cut a 3½ inch circle…but it takes some practice.

Given the option I would not buy one of these again. Too big, too heavy, too much trouble. I have fitted a pedal control to my unit, which has worked very well. Because of the massive motor and flywheel overhang you will likely also want to fit a small light to better see your cutting lines. The drive wheel can sometimes leave small grooves on the flat of the waste steel near the edge of the cut. This is only relevant if you have butted together patterns that you will want to use both sides of the cut from.

At more then 500pounds for the lighter machines in this category (my own machine is way over 400kg) this is not something you will be taking to camping events with you. Mine has been converted to run 240volt down from the three-phase it was fitted for when it arrived here.

Cost. Around $500US (second hand), plus delivery charges (A big add on in this case)


Sheet shears (powered metal scissors)

The following applies to both pneumatic and electric sheet shears (or steel scissors as they are sometimes called). This tool is a bit of a combination between a powershear and a nibbler. You do not get the kerf but the action of cutting is very similar. Most of these tools max out at 14ga mild and suffer from not being manoeuvrable enough in tight curves.

Originally designed for ducting and fabricating light fixture supports on-site the sheet shears leave an okay edge that doesn’t need a lot of smoothing. They are fairly robust and apparently last a long time if not used on over-heavy steel. Cutting compound or oil is a good idea. Some deformation around edges happens on curves. The sheet must be dead flat in order to cut cleanly.

The air driven ones are reasonably quiet…but the pounding of an air compressor adds to the overall noise levels. The electric version tends to be fairly quiet (most seem to be built around the armature of powerdrills), and in both cases the long blade tends to squeal if not properly lubricated as it cuts through metal.

I would not bother owning one of these in my workshop. There are better machines for our purpose for a similar price. The shallowness of curves cut and the lighter gauge steel capacities tend to be limiting.

Air powered shears start at around $40US (but with air tools you get what you pay for). Insure that when using nearly any air tool that the compressor is fitted with a moisture trap. Condensation from the tank going through your tools will kill them pretty fast.

The electric version starts at about $75US (second hand) for the 14ga mild steel capacity units. Bosch and Hitatchi are good brands in this area.


Oxy/Acetylene torch (Gas axe)

The most expensive way to cut thin sheet-steel.

A quick lesson on how Oxy/Acetylene (as well as oxy/butane and similar mixes) works.

This process only works on materials that have an ignition (burn) temperature considerably lower then their melting temperature. So what you are doing is taking a small area of the steel and heating it to the point where it wants to catch fire, you then ignite it with the stream of oxygen and cause oxidisation (just like rust, only much quicker and more focussed). The strength of the stream of oxygen then literally blows the weakened line of oxidised steel clear of the rest of the sheet, leaving a gap. As the torch moves along the steel it allows you to cut lines in this way.

This basically only works with MILD STEEL and cast iron. This method will NOT cut stainless, bronze or aluminium. (The reason is that these metals melt before they burn….kind of makes it messy)

Make no mistake about it. Having an oxy/acetylene setup in the workshop is a good thing. Having the gas-axe attachment means that you can make your own tools, anneal and harden metals easily and achieve all sorts of things. But it is not the ideal way to cut your patterns out of sheetmetal. Yes, you can get sheetmetal cutting tips (they are pricey, about the same as a gouging tip…(which is around 6 times the cost of a regular cutting tip), but you will still need to clean up all the edges. The cutting is slow and requires a lot of concentration on what you are doing, lest you blow a hole in the side of the pattern. The gases are not cheap and the results look like a hamster has been gnawing on the edges unless you have a profile cutter or preheat the whole sheet you are working on.

Basically, what I am saying is, if you can afford it, you do want to have this tool in your workshop, but not for everyday cutting out of armour patterns.

Having said that, a gas axe may be the ideal way of getting that tiny little detail cut in just the place where nothing else will do it. But you would be mad to have this as your primary cutting tool.

Consumables. You will use about 3 times as much oxygen as acetylene in regular cutting operations. Either have the extra oxy bottles on hand or get your cylinders so that the acetylene bottle is two sizes down from the oxy bottle. You will also eventually burn out tips.

Capacity. This is the ideal way to cut thick steel to make tools and anvils and stuff. Actually works less well on the thinner sheets, I would not use it on less then 2mm mild without expecting to do a lot of cleanup.

Cost. Around $200US will get you a decent setup of gauges, hoses, torch, gas-axe and tips... maybe even flashback arrestors (which you really must have) and safety gear. Gas bottles can either be bought or rented for extra.


Uni-shear

You know how I mentioned the 450kg monster throatless shear I have? Well, imagine the King Kong type relative of that tool. Now put that imaginary beast on serious steroids! Now you have something approaching the size and weight of a uni-shear.

I know very little about these very heavy-industry toys. But one of our armourers on the Archive has three of them, and has the pictures of the last time he moved house on his website (the Semi-trailer and the large forklift in the front yard just to move the uni-shears were particularly memorable).

If you want to know more about uni-shears and the zoning laws, noise regs and power requirements that you will need to take into account before buying one, talk to MRKS on the archive.


Tungsten arc cutting attachment (poor man’s plasma cutter)

Only slightly less efficient then drawing your armour patterns onto the sheet-steel with thermite and then lighting it!

The only reason I am listing this is that I am trying for a somewhat complete list, and I spotted this thing at a show recently. The original tool was an attachment that sort of turned your regular arc welder into an electric arc flame machine by having two carbon rods come together over a tungsten tip. This allowed you to use your arc for things it could not normally do: soldering, aluminium welding etc. Basically it was a poor-man’s TIG attachment (a TIG welder is just a very controlled low-powered arc welder after all). The fact that the consumable carbon rods were quite expensive and the tungsten tips were even more so made this US built tool somewhat odd at the best of times. Last year I saw it back again and this time it had the "cutting head" attachment. The carbon rods in this version are impregnated with a powder that flashes to a gas when it is heated by the arc off the tungsten tip. This now happens inside a chamber that has a blowhole aimed at the work. Thus the tungsten arc heats the area of steel the same way as described in the oxy/acetylene process, The carbon rods giving off their supposedly harmless gas then blow the oxidised material out of the gap and there you have a cut. The carbon rods are 6 inches long and last for less then two minutes in the hands of an experienced demonstrator. Can you say "GIMMICK" boys and girls?

I would avoid this expensive thing unless you have far too much time and money on your hands and appreciate a good tech joke.

It does not cut stainless or aluminium; however, the labeling and advertising strongly imply that it will. You have been warned.


Plasma cutter

For the Buck Rodgers armourers among us. (Okay. I am a little jealous)

Unlike a gas-axe, plasma cutters work by ionising the metal rather then oxidising it. This means that they use a strong electro-magnetic field as well as heat to weaken the molecular bonds holding metal together in a very limited area and then use high pressure air to blow that metal out of the gap. This tool requires a decent capacity air compressor (do not just go by the rating but also the storage capacity of the bottle and the constant flow rating) in order to work. This will add an extra thousand or so to the price of you do not already own one. The advantage of the plasma cutter is that it will cut nearly any metal. Stainless, brass, titanium and aluminium are all workable with this tool. The down side is that it will still leave a hamster-nibbled edge that needs filing and smoothing unless you also have a profile table or profile cutting arm and some form of control system. This adds many thousands of dollars to the cost of this system (if you insist on perfect lines).

By the way, the last five or six times I have seriously set my hair on fire doing anything at all in the workshop, I was always using a plasma cutter on a hot and sweaty day. Not trying to imply anything, just thought you might like the data.

As with oxy, laser and water cutting machines, the plasma cutter is able to cut as small a circle and turn as tight a corner as you need. It can handle thicknesses in excess of 3inches for a large enough machine. It is much friendlier to thinner materials then an oxy cutter.

Consumables. Power. These things are powerhogs. They are available in domestic voltage models for the smaller units, but you will still notice the difference of owning one on your power bill. These things are hungry! The other consumable is the tungsten tips. You can re-sharpen them a few times, but in the end they need replacing, On the bright side, dead tungsten plasma tips make excellent scribes and metal punches around the workshop). Tips are kind of expensive and you will go through more of them cutting thin mild steel then you will working heavier materials (more heat is reflected back into the tip and it softens and goes icky)

Cost. These machines are not cheap. Basic units start at over $1200US without any of the stuff that makes them go (compressor etc). You need to be doing some real specialty stuff on a regular basis to justify this toy. Unlike many of the tools discussed here, buying second hand unless you know the tool’s specific history is not a good idea. In my book this is a buy new or don’t buy at all sort of proposition (unless you can get a really good two year warranty out of a second hand reconditioning merchant)


Water cutter

I want one!

Forget lasers and stuff. If you want a tool that really works like a light sabre on steel, a water cutter is it.

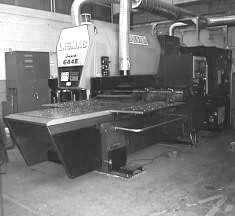
Water cutters are a heavy industrial tool. You will not want to own one. But if you have an engineering shop nearby that has one, you may find it is a viable idea to bring in your stainless steel sheets and your patterns and program it in to the profile cutting table (this tool only works on a profile cutting rig of some sort. You cannot use it hand-held). 
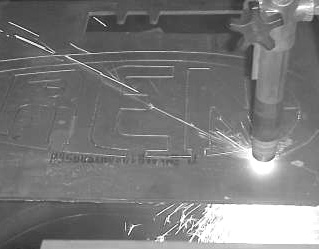
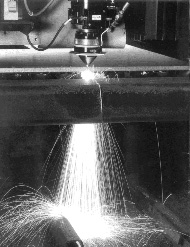
The water cutter will then zip around making an incredible amount of truly awful noise and generate, in very little time, a sheet full of perfectly cut out patterns, with perfect edges that do not need rounding, with no heat distortion or discolouration.

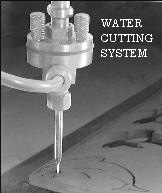
Water cutters work by using an incredibly focused stream of water containing suspended abrasive particles. It is the particles that mostly do the cutting. The water is just a motive force. These things can cut just about anything at all. Wood, plastic, any metal... think of it as the ultimate bandsaw that doesn’t go blunt.

Capacity. Will cut steel up to about 1inch in the size that most medium sized engineering shops will have. A large unit in Japan can cut 5inch plate.

Cost. By the time you add the control equipment and noise insulated building, about a million. That is why you may want to find a jobbing shop and get them to do your mass cutting for you.


Laser cutter

It slices, it dices, it juliennes carrots!

No, You probably cannot afford this tool either.

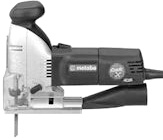
Laser cutters also work best when hooked into a profile cutter, but some units can be hand operated and look like a jigsaw on steroids.

A laser cutter is again a commercial engineering shop tool that may be worth your while to job out as a construction stage. I have sent off to have a few dozen axe heads laser cut in carbon steel for me and was very pleased with the results.

Lasers can also be used for "engraving" and carving metal with designs. In general, what is written about water cutting above, applies to laser cutting also (Laser cutting also uses an air compressor to drive out the kerf in a way similar to plasma cutters)


[ Discussion | Patterns | Essays | For Sale | Links | Main ]
[ Support the Archive | Donate | Search the Archive ]

Questions? Comments? Contact: JT