|
|
|
Building a Propane Forge
Before anything else is said, let's start with the same message that we'll end with: Have your forge inspected by the local gas inspector and perform any other required inspections as per local laws...I do not accept any responsibility for injury or death caused by misuse or failure of any part of this forge. Note: The Armour Archive and all people associated with it also accept no responsibility for injury or death caused by the use, misuse, construction, or failure of this forge. No warranty is expressed nor implied. I have often been approached by visitors to my smithy (Flat Finger Forge...shameless plug) who are interested in how I build my forges. This should explain everything that you need to know in order to build one. Outer frame The outer frame or skin of this style of forge can vary as much as an individuals imagination
but I have found that a piece of stovepipe 16`` in diameter with a length of 28`` works
very well. Into this pipe I cut two holes 2 3/8`` in diameter as shown
Burners For this you will need:
Into the end of each of the 2`` nipples weld the 3`` long pieces of 1 1/2`` and 1/2`` pipe
(as shown in the diagram). Use the pieces of 1/8`` rod as spacers. You might find it
necessary to slightly flatten the spacers to get a proper fit.
DO NOT SKIP THIS STEP!!! These pipes in the end of the burners are important
as they greatly reduce the risk of blowback as well as dramatically decrease the
amount of noise produced.
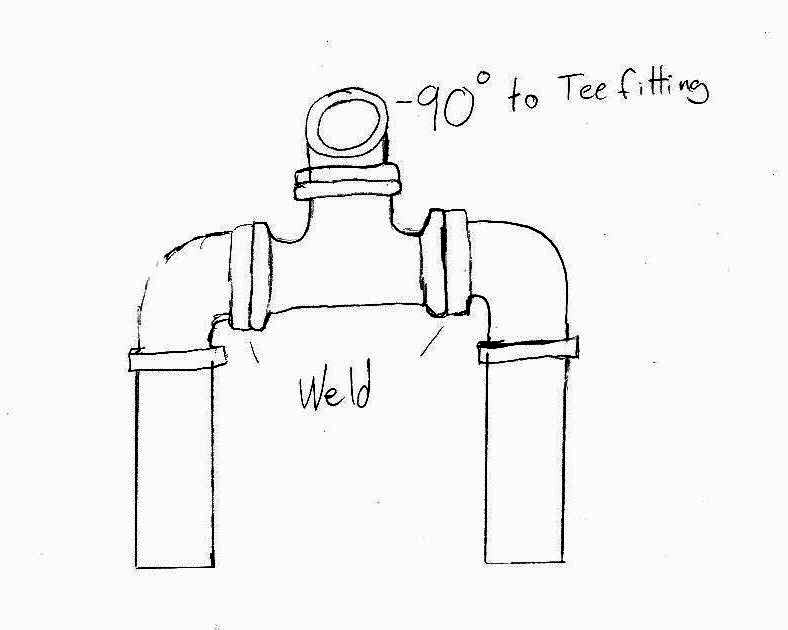
Once you have finished creating the burner nozzles attach each one to an elbow. Next,
weld the elbows to the tee fitting (you may choose to use a nipple but will have to
increase the distance between the holes in your outer skin)
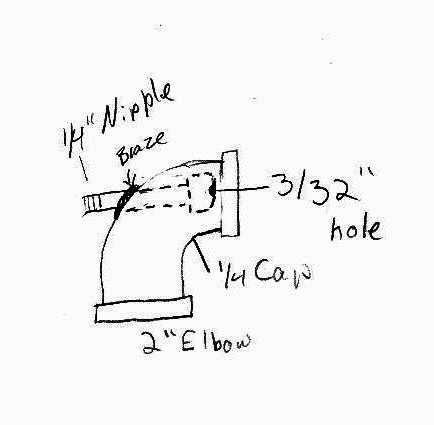
Propane and blower connection In one 2`` elbow drill a 9/16`` hole in line with the centre of the pipe.
Drill a 3/32`` hole in the 1/4`` cap, insert the end of the 1/4 inch nipple
into the 9/16`` hole in the 2`` elbow and thread the cap onto the nipple.
Braze or weld the nipple in place as shown.
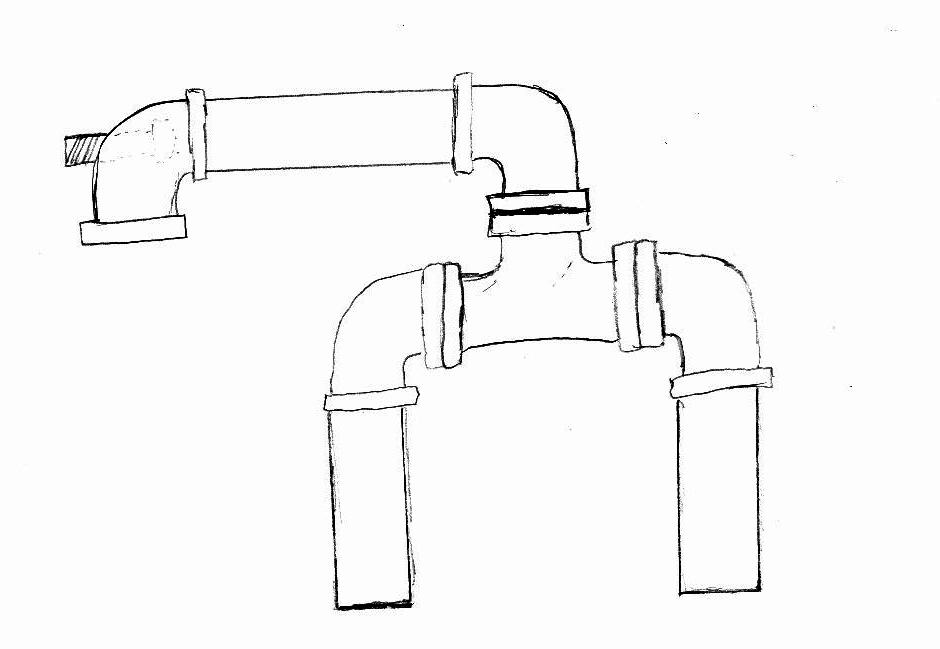
Attach the remaining elbow and pipe as shown
Forming the body of the forge For this you will need:
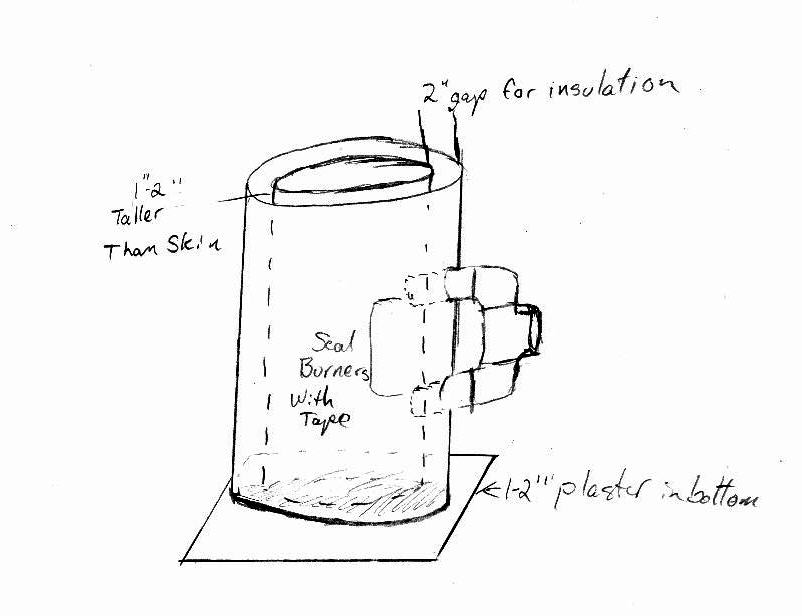
Set the outer skin on the plywood or cardboard base in an upright position and duct tape it into place, making sure to seal the bottom as it will have to be able to hold back the plaster. Once this is finished, cut the sonoform so that it can be placed in the middle of the skin while being 1-2 inches longer than the skin (see diagram). Seal the end of the burners with duct tape and push burners though the precut holes in the skin. mix the plaster to the thickness of heavy cream and pour 1-2 inches thick into the bottom of the skin and, while still wet push the sonoform into the plaster being careful to
This will seal the bottom of the form so that when the cement is poured it will not leak out
the bottom.
Pouring the refractory cement check that the burners are in contact with the sonoform tubing, this is essential as it will be necessary to carve into the burner with a knife later on. (this is easier than it sounds..promise). Mix the cement with water as per manufacturers directions (consult your dealer as to the mixed volume of a bag of the cement you are using as these mixed volumes, I have found, can vary dramatically and you do not want to run out.) Generally the conistancy of cream of wheat or thin porridge is acceptable. Save 1 1/2 gallon of dry cement for later as this will be used for the door Before you pour!!! Did you remember to seal the burners? Pour the cement into the mold and allow to cure. once this is done set the forge on its side and hook up the rest of the piping. Final assembly So you have the body and plumbing finished... it's time to hook up the blower,
using a modified furnace fan, shop vac, leaf blower, surplus blower fan...you
get the idea, and a length of suitable tubing (plastic is fine between the propane
fitting and the air supply as long as care is exercised) Construct either a
butterfly valve or sliding air gate to control air flow if this is not possible
using a rheostat. (see below)
Doors Mix 1 gallon of refractorey cement and with the forge in a vertical position place the mix in a bag and lower to the bottom of the forge, allow the bag to conform to the shape of the forge. Do not block both ends of the forge Doors can be used to block one end only. This may seem obvious, but you would be surprised. One apprentice attempted this and the result was... unfortunate. The extra half gallon of refractory cement may be used for patching at a later date if necessary. Place the forge on a steel table or suitable fireproof surface and make the final attachments. Do not put on a door at this point. The forge should be thoroughly dry now, having been allowed to dry in a warm place 2-3 days . Using a knife cut a hole to at least partially clear the burner opening. Take the forge outside into a safe are as there will be a lot of burning embers ejected from the forge in its initial firing until the sonoform is burned away Feel free to remove as much of the sonoform as possible ahead of time but be careful not to damage the "raw" cement. Turn on the blower and adjust it so that the slightest draft can be felt through the burners. Light a piece of paper and adjust the regulator to 1 or 2 psi and the forge should light. Turn up the pressure if necessary. CAREFULLY watch the cement for steam -- if this starts turn off the forge and allow it to cool for a while and relight. Do this as many times as necessary. Be patient, as rushing this could cause the steam to build pressure, destroying all your effort. When this step is finished place the door in one end, and SLOWLY raise the temperature. Your forge should heat to 2000 F in about twenty minutes at 4 psi. I operate mine at 2-5 psi depending on the use, and it costs me $1-$1.75 an hour Canadian. Enjoy and good luck; Caius Legal Junk Have you forge inspected by the local gas inspector and perform any other required inspections as per local laws. I do not accept any responsibility for damage, injury or death caused by use, misuse or failure of any part of this forge. Now that we have that covered (again) -- Good luck and happy metal banging These plans are free for use however they remain the property of Flat Finger Forge Co. and are not to be redistributed for the purpose of resale. |