|
|
|
|
Constructing Articulated Joint Armor By: Gundobad von Dettelmach Wise Ogre Armory This article borrows heavily from "Articulation Articulated," which appears
in "The Knowne World Handbook," a publication of the Society for
Creative Anachronism, but that article has some serious flaws, that I hope to avoid in this one.
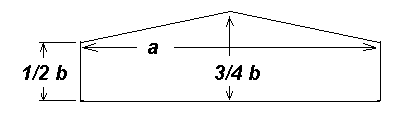
The next step is to make your pattern. You will need to measure your bent joint, with padding in place, perpendicular to the limb, across the outer point, from the ends of the crease formed inside the bend of the joint. Call this "A". Then calculate 45% of "A". The result is "B". Use these dimensions to lay out a pattern as indicated in the diagram below. 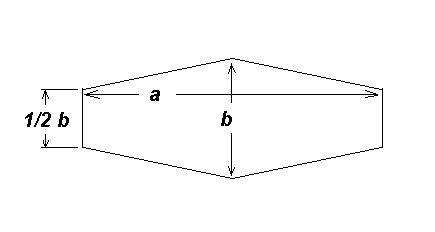 At one end of the pattern, add a fan or wing. This can be virtually any shape, but should be approximately "B", top to bottom and should extend approximately "B", beyond the end of the pattern. At the other end, add a curve, from corner to corner, to cover the inside of the joint. This is your pattern for the cops. Then make a pattern for the lames, as in this diagram.
Round off all the corners of your lame pattern, slightly, about a 3/8" radius curve works well for all sizes except the tiniest, which require smaller. Cut out 2 cops, and as many lames as you like, in even numbers. I recommend four for each cop. Smooth your edges, and flatten out any twisting caused by the cutting process. Then mark where the rivet holes will be in your cop, with a center punch. They should be equidistant from the center point [not counting the fan] They should be 3/8" from the edge of the metal, and 3/8" to 1/2" in from the ends of the A line. Drill or punch your holes only after you get the cop dished and planished.
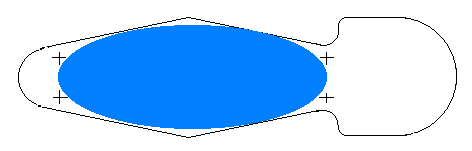
Whatever shape you chose for your fan, you should put at least one flute down the middle of it to strengthen it. Draw lines on your piece, like the purple ones above, and drive the metal, with your flat chisel, into the channel on your forming block. Start from the center, and reflatten the metal to either side of each ridge as you complete it. On the fans, it doesn't really matter, [except for style] whether you push the metal out or in [you could alternate, in fact]. For the best results, you will need to sharpen up your flutes over a stake. See Scott Swindell's article on fluting, or mine [once I get it written]. When that is done, you are ready to begin dishing. Start at the edges, and work your way in. Dish the approximately oval area bounded by the holes, shown in blue below, and dish deeper as you approach the center of the cop.
This will be the physically hardest part of the job. Take your time, and get a smooth curve, with an average radius approximately equal to "b" this should naturally bring the undished areas at the ends of the pattern parallel to each other, so that the holes "match up." If you have some bumpiness to take out of the surface of your dishing, do it with the planishing hammer, on the ball-stake. See my article "How to Planish" for more information. If you want to flute the cops, do so with your round chisel, into the slotted dish. Draw a line inside your cop, from point to point, and line it up with the slot. Don't over do it with the chisel, as you don’t want to crack your cop in half by trying too hard. Flute your lames with your flat chisel, in the flat channel, along the blue line shown below. Finish up those flutes over a stake as well. Now you are ready to bend your lames into curves that fit into the cops, with flat ends that are parallel, like the cops. Before you curve them, mark them on the outside as the purple line in this diagram. The last inch or so on each end will remain flat.
The purple line should be 3/8" in from the edge on an elbow-sized piece, or 1/2" on a knee. When your lames fit into the cops correctly, you should be able to fit the lame snugly into the cop, at the fully closed position, with the "top" point of the lame aimed at the center-point of the cop. I WANT TO EMPHASISE THAT THE "POINTY" SIDE OF THE LAME GOES "IN", TOWARD THE CENTER OF THE COP. If you want to exaggerate the shape of the lame, for a "Gothic" look, you can add a point to the outer edge, as well. Line up the purple line with the holes on that edge of the cop, and make marks on the line. Number the edges of the cops, and the lames to match, so that you don't mix them up, unless you are so extraordinarily precise in your work that it does not matter. If you need this article, you aren't likely to be that precise, yet. Punch or drill holes at the marks. Test your fit by putting bolts through the holes and moving the lame. It should pivot smoothly, and stop without sticking at both ends of its range of motion. A slight dish along the inside edge [the one with the point] of the lame will likely prevent stickage at the fully closed position, and a slight flattening of the outer edge of the cop will do the same at the fully open position. If the piece pivots "in" so far as to open a gap [the dreaded disease, gaposis], you didn't have the lame fitted tightly enough to the cop when you marked it. Try again. Be more careful this time. You may be able to use the same lame, if you don't mind an extra hole or two, which probably will not show when the piece is done. If on the other hand, the piece is too tight, with no range of motion, you have somehow managed to fit it too tightly. Try again. Your extra holes are much more likely to be visible on the finished piece, but hey, it's your first attempt, right? If the piece moves right, you are ready to rivet it in place. Insert the rivet through both pieces. It is easier to put the head of the rivet on the inside, so that it sticks out, but this is ugly, and not period in style. I put them in from the outside, and place the burr on the inside. Then peen [tap with the ball-peen hammer so as to deform it into a rounded shape similar to the head] the end of the rivet down, but not so tightly as to prevent your lame from pivoting. It's a lot easier to go too far than not far enough, so once your burr stops trying to fly off every time you tap the rivet, stop frequently to check your progress. By the way, use the round side of the hammer head. I know that will sound obvious to some, but I have seen too many folks try it the other way. Once you get the first lame in place, just do it again for the other side. If you want additional lames, add them on in the same way, it's easier to fit lame to lame properly than it is to fit lame to cop. |