|
|
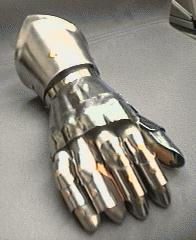
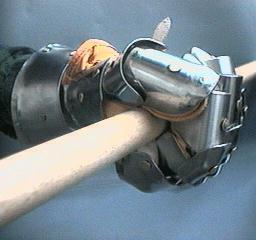
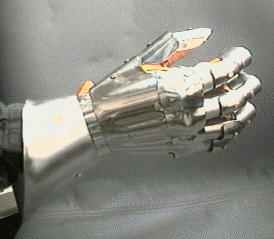
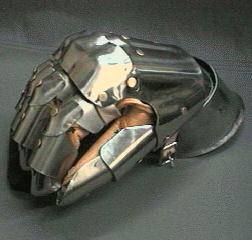
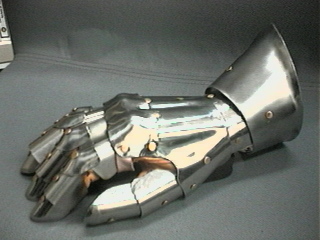
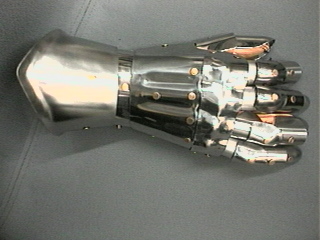
Fingered Gauntlets
by Thor Z.
This pair are Italian styled, so there is only the hint of fluting down
the back of the hand, and all shaping is done using smooth rounded surfaces.
This style was designed specifically to allow totally free movement of the
wrist since this feature seems to be a common desire for SCA fighters.
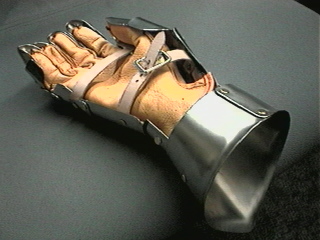
The gloves are deerskin made with the stitching on the outside, which makes
it easier to sew the gloves into the gauntlet. All but the bell on this pair
has a mirrored finish. If you leave the protective plastic on the metal until
the last minute (much like contact paper) and bend the metal as much as possible
rather than hammering it, the reflective finish can be maintained. I don't
know how long it will last in combat before it gets all scuffed and scratched up,
but it sure looks sharp.
Without the fingers, thumb and knuckle plate, this design would make an excellent
demi-gauntlet for fighting with a basket hilt sword.
Pictures
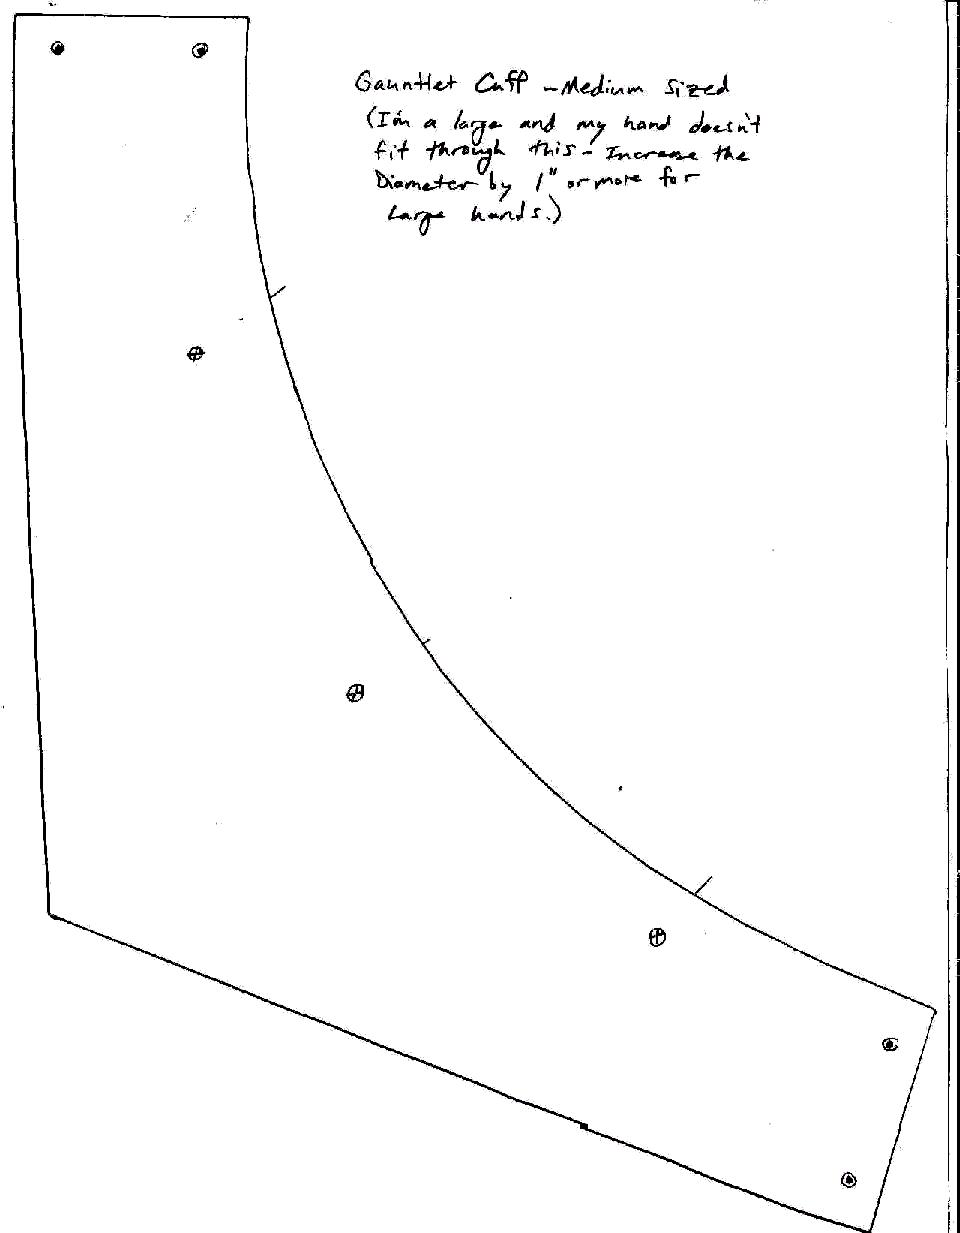
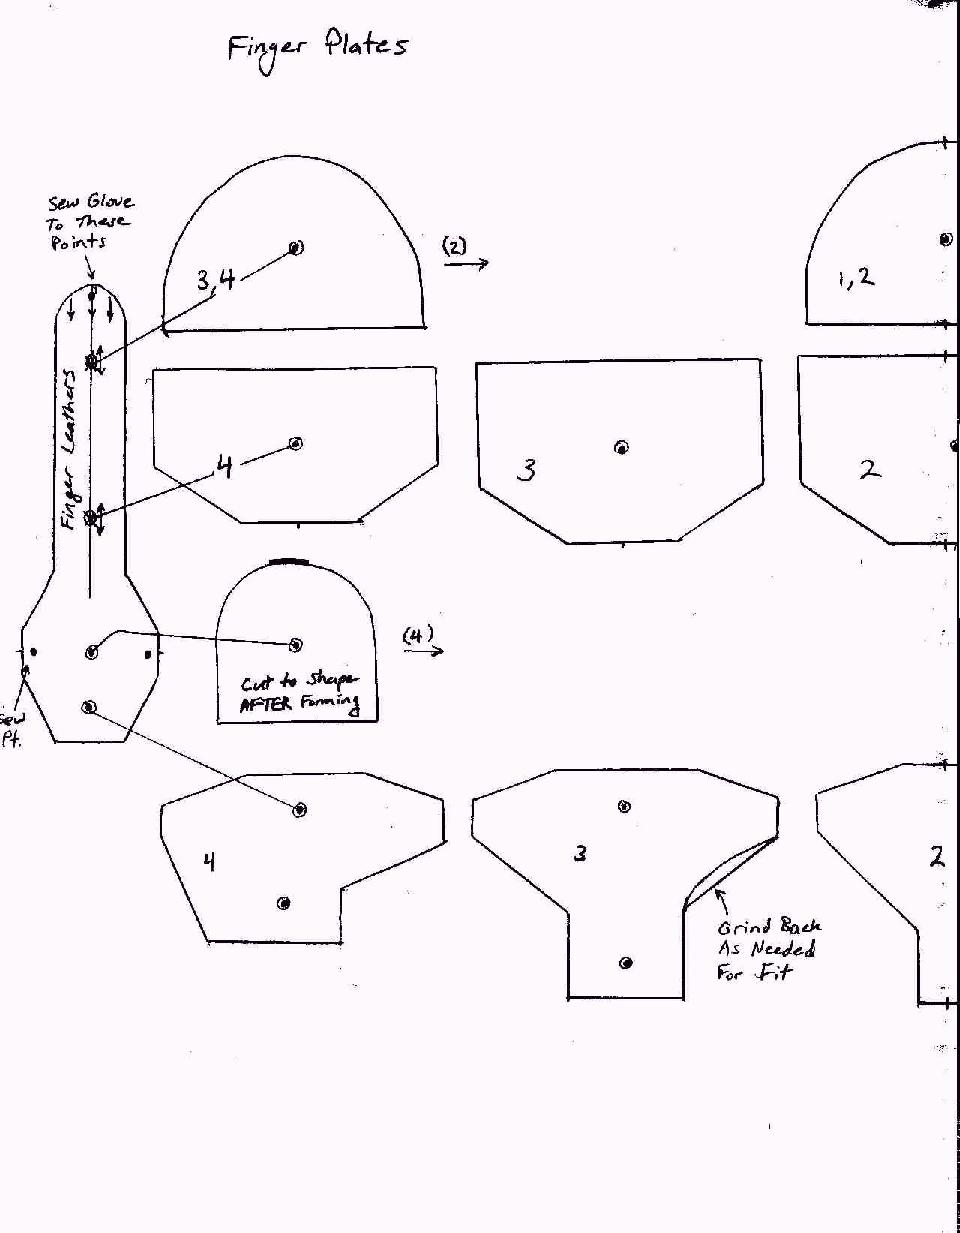
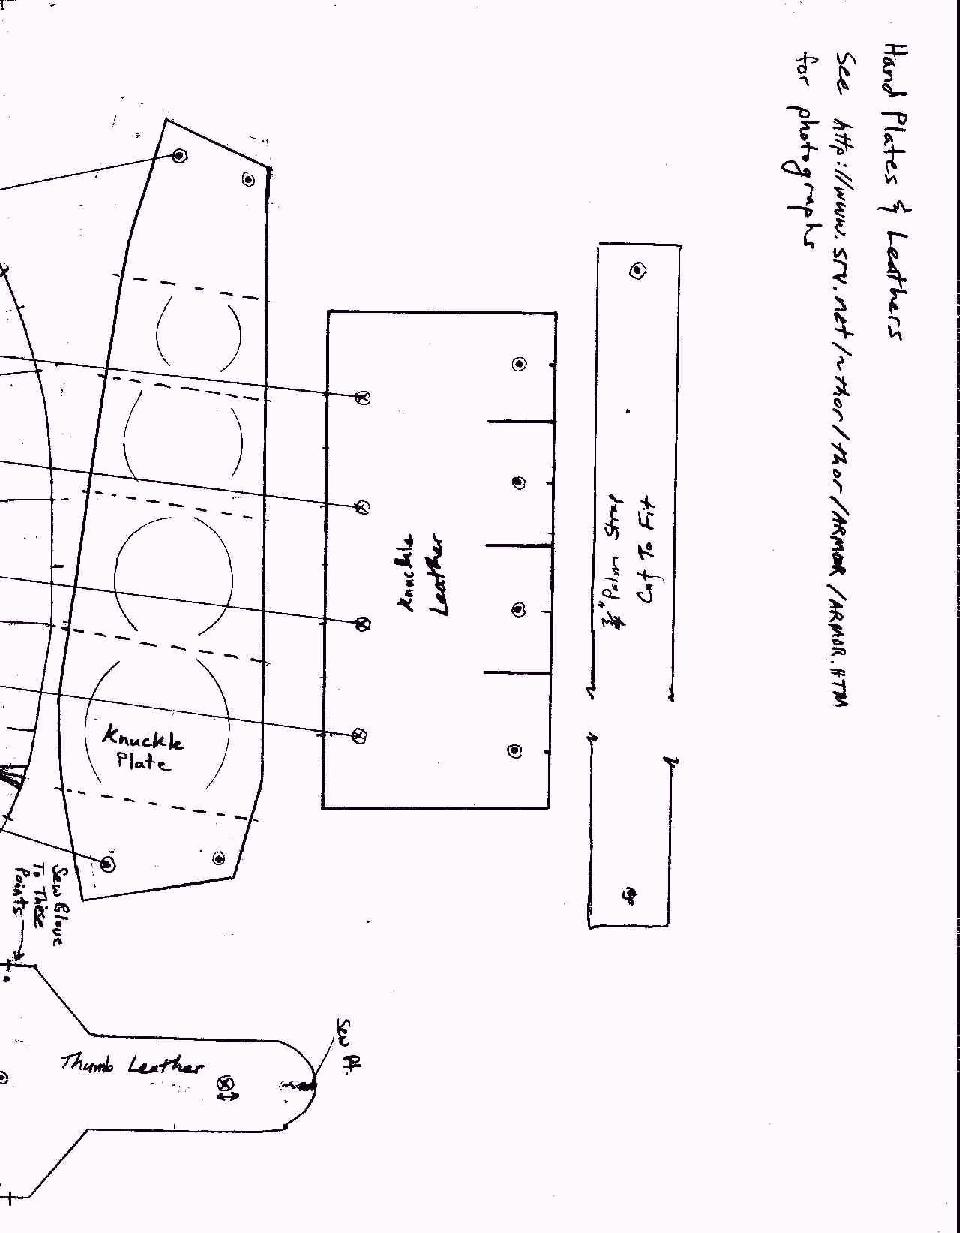
Patterns (Click on thumbnail to see full-size image)
Note: These Patterns are shown at 150dpi
Gauntlet Assembly Instructions:
A Note On Riveting:
Setting rivets can be a real pain if you don't know a trick or two.
One trick I've learned is to use a piece of 1/4" foam rubber to hold
the washer in place while you set the rivet. This way you can set
the rivet by striking the head rather than the shank. It also helps
if the shank sits in a slight depression in the anvil while you
strike it.
Another trick is for properly spacing plates so they pivot easily
after you rivet them together. Put a piece of heavy poster paper
between the plates where they will pivot, put the rivet through, put
on the washer, then the foam. Set the rivet and remove the paper and
the joint should pivot smoothly (provided you shaped the two plates
well to start with).
The small rivets I use are 1/8" Tubular Brass Rivets (the shank is
hollow part way).
The larger ones are 3/16" Round Headed Brass Rivets (solid shank).
Cut the extra shank off or it will bite you when you get hit.
You'll also need a punch of some sort to set the finger rivets. I
use a 1/2" diameter x 3" steel pin I found at the Army/Navy surplus.
I get my smaller rivets there also for really cheap and buy #5
washers to go with them. The larger rivets I get from an industrial
supply company.
- The first chore is to lay out the pieces, cut them out, grind where
needed to the final shape, and file all the edges rounded and smooth.
"Cut to shape AFTER forming" on the knuckle plates means you need to
shape the bulge into the piece first. This was done by placing a
larger piece of steel than needed between a 1" length of pipe (with
about a 1" inner diameter) and the round end of a ballpeen hammer.
Center the ballpeen and strike it with another hammer to bulge the
steel downwards into the pipe. To keep from scratching it up too
badly, put a piece of heavy poster paper between the pipe end and the
plate. After you've got the bulge you want, trace out the shape of
the knuckle plate around the bulge and cut it out. If you cut it out
first, the metal has a tendancy to buckle and crease rather than form
a bulge.
- Drill the rivet holes into the plates now, before shaping.
- Finger Plates - these were given a semi-tubular shape using the vice
attachments described on the bottom of the web page for Style #2.
(From Style #2)
During design, I manufactured a set of Bending Jigs fitted to my small
vice to help in getting more consistant bends in the metal. Here's how:
Remove the jaws of your vice by taking out the screws and measure
their spacing. Make four pins out of screws with the heads cut off to
thread into the vice. Collect a set of short sections of pipe and tubing
ranging from 1/2" up to 2" diameters, then drill three holes in the tubing;
the first about 1/2" from one end, then the other two spaced the same as
the vice screws down the length of the tubes. Next, you need to make the
mating pieces to press opposite the tubes. I found a few pieces of scrap
unistrut to use, which is square U-channel used to mount electrical conduit
onto the walls of industrial buildings. Bend the sides inward to space the
edges where they will contact the tubes to 1/4", 1/2", etc. up to 1-1/2"
apart. Then, drill holes along the back on the centerline of the channel
sections just like you did the tubes. You can now slip the tubes and
channels on and off the pins quickly as needed to bend gauntlet fingers,
hand sections, etc. at will. Clamp a work piece between the tube and
channel to start the bend, then wrap the metal around the tube with a
rubber-faced mallet or hammer. In addition, I drilled a pair of wood blocks
to act as vice jaws which also slip onto the pins so I can use the vice as
a vice without having to remove the pins.
(End Style #2)
Forming the pieces around a small piece of pipe gives you a
consistent bend every time. Pinch the pieces or flair them back open
as needed so that the plates for each finger fit inside each other
properly and fit around your fingers in a glove.
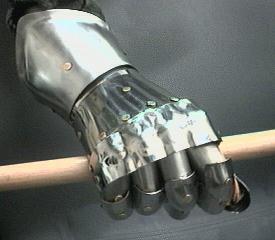
- Finger Tips - Clamp a small ballpeen hammer into a vice. Roll the
finger tip edge inward by hammering it between the ball of the
clamped ballpeen and another hammer. Reshape the part after rolling
the edge since the plate will tend to loose the tubular shape it had
before you started this step.
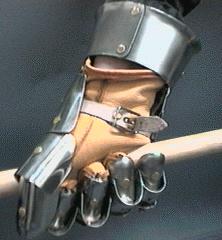
- Hand Plate - (This is the hardest one) Put the flutes in that go down
the back of the hand by bending the metal along the flute line
sharply to an angle of about 45 to 60 degrees, then reflatten it
between a board and a concrete floor. When you get done, you should
have a slight rounded channel continuing the shape of a finger down
the back of the hand.
- Shape the piece so that it wraps around the back of your gloved hand
using the vice attachments by putting in the larger radius bends.
Bend about 1/2" of the front edge downwards slightly above the 1st
finger so that it folds over the front of your knuckles, lessening
the amount bent downwards as you go towards your smallest finger.
The notch cut in the plate between the thumb and 1st finger allows
for this bend and will be hidden under the Knuckle Bridge plate.
Re-round sections of the front edge to match the shape of each
finger.
- Main Knuckle Bridge - Put the bulges into the plate as described
above, then roll the ends downward so that it fits over the Hand
Plate and pivots properly. Use screws to hold the two pieces
together to test the pivoting. Getting these two parts to work
together will take a lot of time, but will be worth it in the end.
- Bell - Shape the part into a tube and rivet the ends. Flare the bell
next by hammering using an appropriately shaped section of an anvil;
the flair gives the Bell the strength it needs to keep from buckling
when it takes a shot.
- Wrist Lame - Shape this piece so that it fits inside and matches the
contour of the back edge of the Hand Plate and the front radius of
the Bell. You may end up reshaping all three of these parts here so
that they fit together properly.
- Leather - Layout and cut out the leather pieces as you go.
Fingers - Start with the upper plate, rivet it to the leather strip,
then add the Knuckle Plate and work your way down to the finger tip.
Punch the rivet holes as you go by fitting and marking through the
holes in the metal plates. The finished finger should be slightly
longer than your gloved finger so that there is room for your finger
to bend.
Rivet the fingers to the leather that will connect them to the Hand
Plate, adjusting the attachment holes to match the staggering of your
fingers as needed. Carefully fit the Hand Plate and Fingers onto
your gloved hand and mark through the holes in the Hand Plate onto
the leather. Rivet the fingers into place.
- Repeat the process to assemble and attach the Thumb.
- Put in the rivets to attach the Knuckle Bridge and allow it to pivot.
- Rivet the Wrist Lame to it's leathers and rivet the center strip to
the Hand Plate. Cut the wrist strap too long, punch a hole in one
end, then rivet the strap and Wrist Lame leather to the Hand Plate
using the same rivet, then do to opposite side.
Rivet the Bell to the Leathers.
Rivet one end of the Palm Strap, try on the gauntlet with a gloved
hand, cut the strap to length, rivet it on, and you're done with this
part.
- Stitching in the gloves - Use an awl and a block of wood to punch
holes through the glove where the stiches will go. Use waxed thread
(which stores like Tandy Leather carry) and an oversized needle.
Loop the thread through a couple of times, then tie it off. There
should be prepunched holes in the finger and thumb leathers already
at the finger tip and on either side of the knuckles under the
Knuckle Plates to stitch the gloves to. It helps if the gloves are
sized a little small at the finger tips so the fingers stay up in the
finger plates when you fight, otherwise you can get bit by the plates
when you hand is hit.
- Put on the gauntlets and find a mirror! Everybody else does...
|